
with

All developers strive for DRY code, or logic that isn’t repeated throughout the codebase. By making code DRY, you create modular logic that is easy to use across features and does not need to be managed in multiple locations. React developers approach DRY coding with components or modular UI elements. React adds a layer to these modular elements by introducing custom hooks, allowing developers to create DRY state management logic for UI elements. Today we will discuss how to build a custom React hook to populate dropdown components.
Custom React Hooks and Async useEffect Calls
We must review theory before building a dropdown component and its custom React hook. Base topics built into this component include what custom React hooks are and how to perform async actions within a useEffect call.
Troubleshooting and development are faster and less bug-prone when you understand the theory behind what you are building. Let us start by examining custom hooks in React.
What are Custom React Hooks and Why Use Them?
Custom React hooks are still a somewhat new feature. React was released in 2013 as a new approach for front-end developers disillusioned by JQuery and not sold on Angular. It provides the JSX syntax that serves as a wrapper around JavaScript classes to allow easier creation of UI components. At its inception, React only supported class-based components.
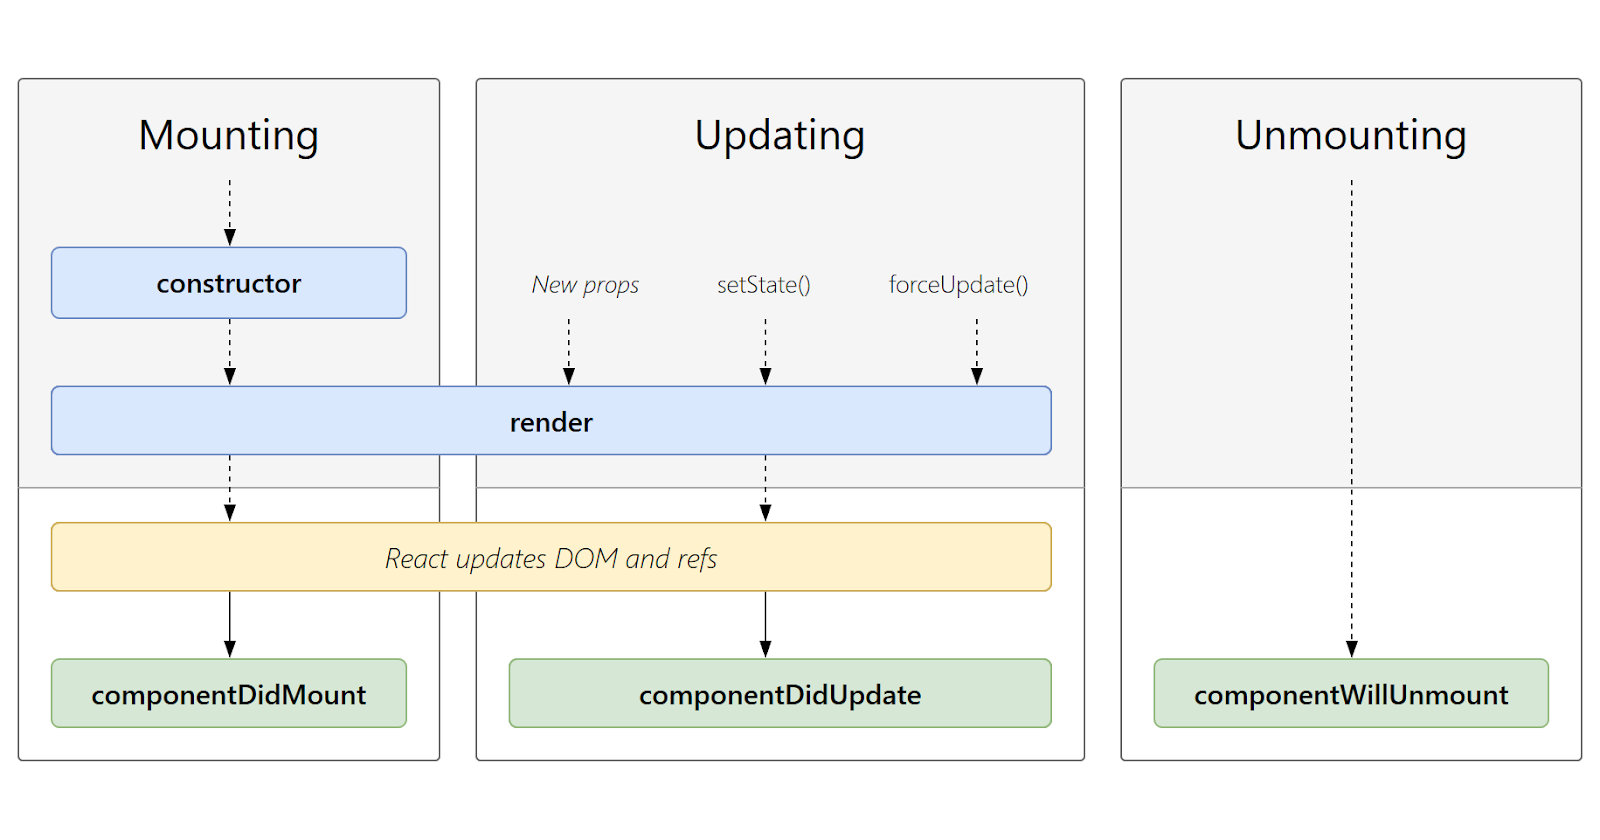
However, as more developers adopted the library and provided feedback, React engineers added function-based components to React. These components are lightweight and allow easier state management through state hooks. These hooks are built-in functions that replace the class-based component lifecycle methods. The class based lifecycle methods look like this:
React offers popular built-in hooks like useState for creating and updating state variables, useEffect as a catch-all state lifecycle management method, and useMemo to cache heavy computational functions and calls. These hooks are helpful for one-off functionality but have even more power when combined to manage complex tasks. This is where custom hooks come in.
Custom React hooks are functions that package logic shared between multiple components into a single, reusable function. If you are acting on the state in the same manner for many functional components, it is best practice to refactor this functionality into a single custom hook function.
Say we have multiple styling guides for our dropdown component. We have a customer-facing dropdown for external users, but a different dropdown for internal users. The naive way to approach this would be to add separate logic to fetch and manage the dropdown options in each component. If the logic is the same for fetching data, why would we rewrite it for each instance?
The only thing changing is the UI. This approach is not DRY. Custom hooks allow us to extract the API call and state management logic into a single method. This consolidates our logic into a single file and allows us an easy option to reuse this logic if we add more similar components.
How to Make Async Calls within a useEffect Call
We have discussed custom React hooks, and now we need to talk about using the useEffect hook to retrieve our dropdown data on component load. The useEffect hook is popular as it allows developers to manage state updates based on class-based component lifecycle methods.
There are two parts to the useEffect hook: a callback method and an array of state dependencies. This hook is called on component mount, running whatever logic is in its callback as soon as the UI element is first loaded. After that, it will run anytime the declared state dependency values change. This is similar to the class components componentDidMount and componentDidUpdate methods.
Say you have a counter that changes the color of the counter number text based on the current value. If you add the count state variable to the useEffect dependency array, the checking logic in the callback will run every time the count state variable changes.
We do not need to worry about rerunning the useEffect callback based on state changes. We only want to set the state by making a fetch call as the app loads. For setup, we will make an async call within our useEffect method.
This will lead to issues. All logic needs to go into the useEffect’s first argument, the callback function. If we want an asynchronous action we use the async await syntax. We place async before the function arguments list and then prepend an asynchronous action with await to halt our program until the returned promise is resolved
With useEffect, we cannot do this. The useEffect callback does not expect return values, but adding async implies that we will return a promise. This will throw the following error:

We can avoid this by creating a method within the callback and calling this method. With this approach, we won’t return or imply that we are returning any value and will not raise an error.
Building our Dropdown with a Custom React Hook
The best way to learn programming is to see it in action. We will build a simple dropdown app, populated by making API calls for option values. This will have two services: a React front end and a Node and Express Backend.
Here is a link to the final code GitHub repo. You can review this, but it is best to type along rather than only reading the article. To get started, open your terminal and enter the following commands:
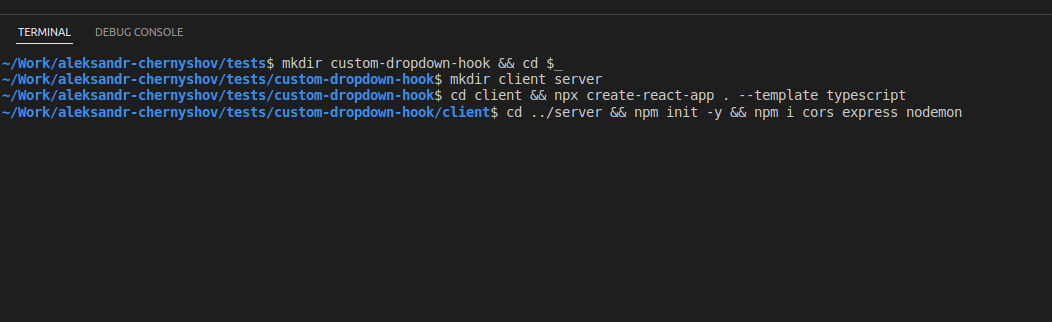
First, we create our project directory and navigate into it. Next, we create two directories to house our two app components, the client and the server. Within the client, we run create-react-app to build the react app. Within the server directory, we initiate an npm project and add some dependencies for web requests and to make local development easier.
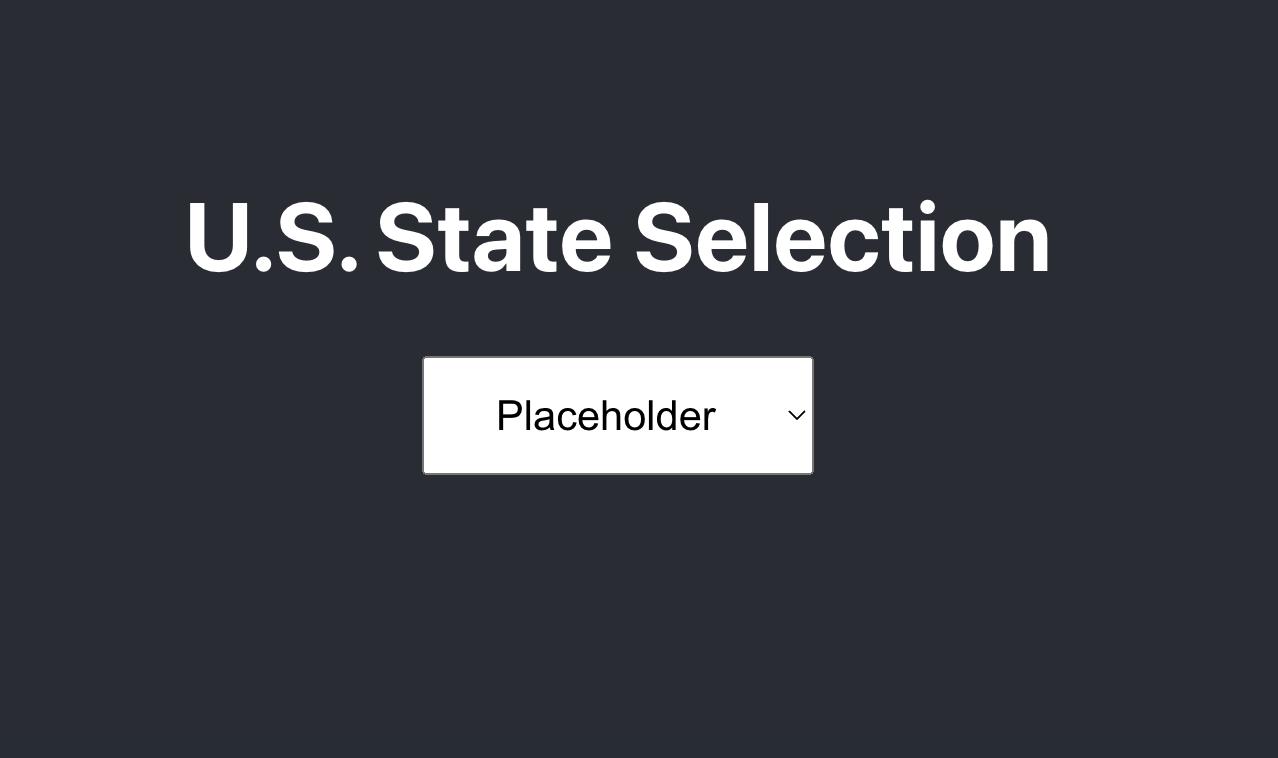
Now that we have our basic project setup, we will start our client and make sure it works. Then after we have added some changes to the create-react-app scaffolded app, our UI should look like this:
Next, we need to set up our server. This server will be a Node and Express server handling REST requests from our client. The setup is simple: we create a server, give it a port to listen on, and create a method to respond to GET methods. The code for this server setup looks like this:
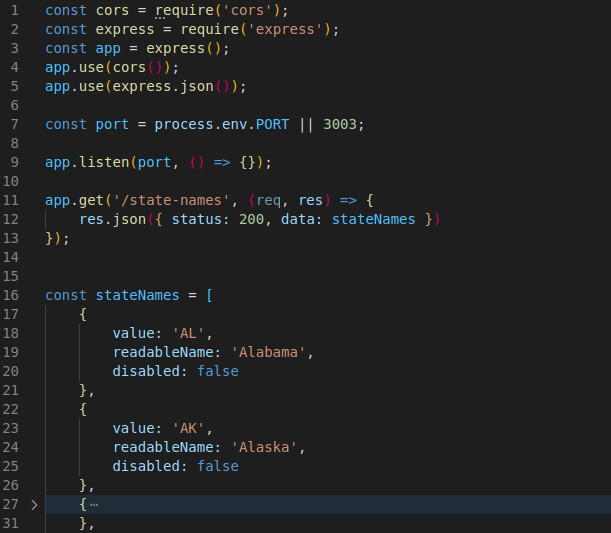
The main point to look at with our server is how we structure the data for the response. Our client will iterate over a list to create option HTML elements within our select tag. We could build an array of strings for each state and pass that in the JSON response payload. This works, but is not ideal. This is our flat string US state array:

While this array of strings can populate the values of our dropdown, these values are not readable representations of the data and do not offer further customization from this data. What happens when the option value is not equal to the readable string? What happens if we want to show options that cannot be used? A simple string array won’t do.
Instead, we can use the following record object structure for sending over more robust and complete data:
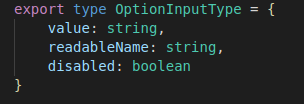
This structure provides all the data we need to fully populate an option HTML element. We have a readable name value for the user to see, a value variable for setting the select tag, and a disabled boolean to drive whether the option is selectable. This data may seem more complex, but it ensures the front end has all the data it could want when populating the dropdown.
With the server complete, let us return to the client. The purpose of a client is to retrieve all programs, assets, and data and present them to a user in an easy-to-use and engaging manner. We have hardcoded some filler data in our dropdown, but now it is time to call our server to get the list of states.
We could add a method in our main App.tsx file to fetch the data and set our state variables for the stateList and currentState. However, this would not be DRY as we would have to replicate this dropdown fetch logic in every future dropdown component. Instead, we will create a custom hook to retrieve the data and set our state values.
Directory structures in React are very flexible. There is no one way to structure your project. Some developers will create a src/util directory for their custom hook files. We will place our custom hooks in a src/hooks directory.
Create your src/hooks directory and then create a new useLoadDropDown.tsx file. One rigid convention with hooks is the name of the hook must start with the word use. This will ensure your IDE and linter can correctly identify the method as a hook.
The logic for our custom dropdown hook will look like this:
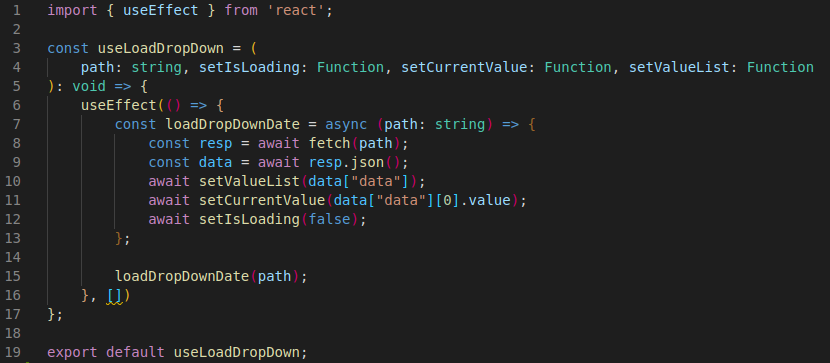
We will accept 4 arguments for this hook: a path that represents the URL we want to retrieve data from, a setIsLoading method to update if you are loading data, a setCurrentValue method to set an initial value after fetching the data, and a setValueList to store the retrieved data as a collection to iterate on.
Within useEffect, we will create an async function that fetches and resolves the response data from the server. It then does setup by storing our data in a state variable, setting an initial value, and disabling the loading. Below our function declaration, we call the method and retrieve our data.
If you want to make this component more robust, you could add an error state variable to the App.tsx. This would allow you to change isLoading to isError if you fail to access the resources on the server.
On the 16th line we deliberately make the dependency array empty, since we want to imitate the componentDidMount lifecycle method as in a class component. That is, the data will be loaded only once when the component is being mounted in the DOM.
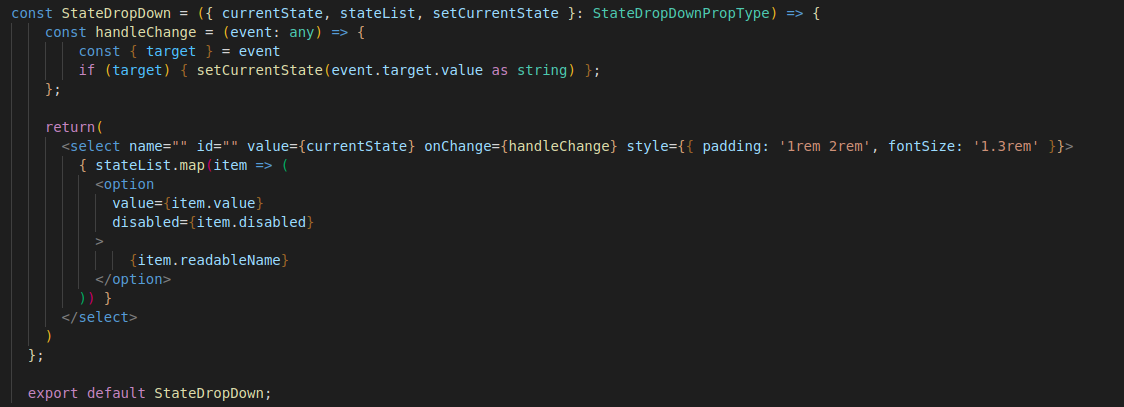
Now that the hook is built, we will import it and call it within our App.tsx. This component is our stateful component that will manage and pass data to child components. One of the child components is our React select component StateDropDown. You can review that code in the StateDropDown.tsx file.
Our final App.tsx file looks like this:
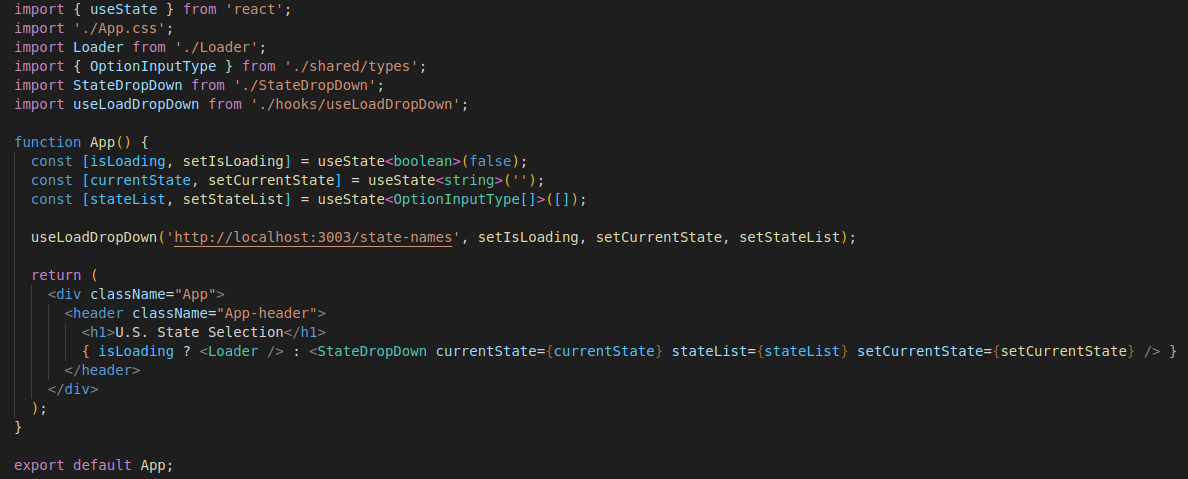
We set and manage our dropdown state at the App.tsx level, but leverage our useLoadDropDown to hook to perform data retrieval and state setup. This pattern can be used with any dropdown component we have going forward, reducing fetching and managing the dropdown state to simply managing the dropdown state.
Need Help with Your Existing Code or a New App?
Code complexity is ever-increasing and evolving. Keeping current with existing technologies to maintain or build new apps for your business is challenging. Incode Group can help. We are an international software development company focused on industries including real estate, healthcare, and education. If you’ve got an idea, we have the designers and developers to make that idea a reality. Let us know what you need. We always love to have conversations.
Start a project.
-min.JPG) Book a call
Book a call
.png)
.png)
